[ad_1]
It’s a little off topic, but it ties in some of the Secure Boot topics that I had discussed previously, and might be useful to anyone trying such a maneuver in the future. I’ve been using Tivo DVRs for many years, and this is the fourth drive replacement that I’ve done. Sadly, it’s only one year after the previous drive replacement. (That short lifespan is tied to Western Digital and CMR vs. SMR drives. If you care to read more about that mess, see blogs like this one.)
The process for replacing the drive isn’t that bad: Get a new drive, same size or bigger. Connect both drives (via SATA) to a desktop computer (USB works too, if you happen to have multiple SATA-to-USB adapters that work with 3.5″ drives). Boot into a Linux USB key. Run an “mfscopy” command to copy all the content from the old drive to the new drive, skipping anything that runs into a bad block. The basic process can be found on page 7 of this post in the Tivo Community forums. (Yes, that post is from almost six years ago, but the process hasn’t changed much.)
The previous time I did this, I took my old and new drives into the office (remember when people worked in those?), connected them to an old surplus PC, booted it into Linux, and copied the content. Many hours later (we’re talking about terabytes of data here), the process was done. This time, the process wasn’t quite that simple because I no longer had access to an old PC. Now, all the PCs I have access to (with at least two accessible SATA ports) are UEFI-based. That means I need a USB key that can boot via UEFI (no CSM available). Sadly, the downloads available on the forum post do not work with UEFI (even if they say they might — they don’t).
Short of going out and buying the cheapest possible (disposable) PC, it seemed like there should be a way to get this to work. The forum post mentioned that they used openSUSE x64 LEAP for their Linux image, so I figured that was a good place to start. I downloaded the latest openSUSE x64 LEAP ISO from https://get.opensuse.org/leap/. Click on the “Live” tab and choose one of the “Intel or AMD 64-bit desktops” versions. (I chose GNOME LiveCD.) Once you’ve downloaded that ISO, you can “burn” it to a USB key (which will destroy anything on that USB key) using a program like Balena Etcher. Insert that USB key into your PC, and try to boot it.
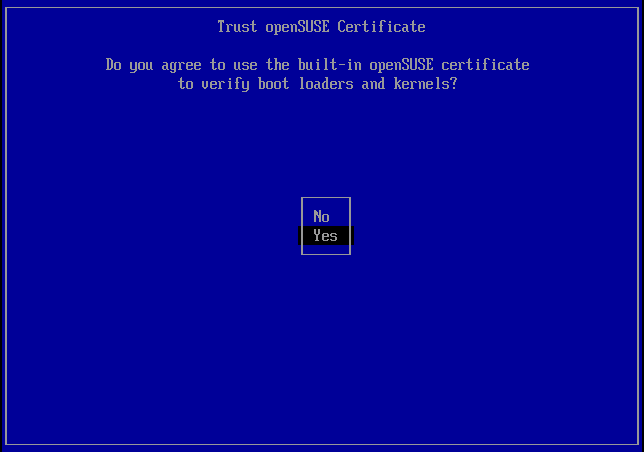
If you have Secure Boot turned on (which you probably do, as Windows PCs ship with that on by default), it will boot, but only after you allow the openSUSE boot loader and kernel:

This effectively whitelists the openSUSE signing certificate so that it is trusted to boot on your PC. (You can clean that off later if you want.) This uses the shim/grub/MOK process that you can read more about here.
OK, so now it should boot into Linux. But now what? Shut down the PC, attach the SATA drives, old and new, and boot from the USB key again.
Next, you need the MFS Tools mentioned in the forum post. As those aren’t available separately (just in forms that won’t boot on UEFI systems), I needed to download the MFS Tools ISO, mount it, extract the squashfs image from inside it, mount that squashfs image (requires a Linux OS, which I just happen to have), and then copy the files from /usr/local/bin folder in the mounted location to another USB key (as you won’t be able to write them to the Etcher-created USB key):

As that’s a non-trivial exercise (probably wouldn’t have been able to do it myself six months ago), I’ve attached a zip file with those tools (MFS Tools 3.32-devel) at the bottom of this post. Extract that zip file on to another USB key, and insert that key into your PC (so now you have two, one that you booted openSUSE from and this one). You’ll have to mount that USB key manually, which requires a little explaining. First, open a Terminal window and look at all the drives with this command:
lsblk -o name,size,vendor,mountpoint
You should be able to identify the USB drive by its size (if nothing else) — it will likely have a blank mountpoint value. Then you can mount it using these commands:
mkdir /mnt/usb
mount /dev/sdc /mnt/usb
In my case “/dev/sdc” was the USB key with the MFS Tools on it. Change to that folder (e.g. cd /mnt/usb). The next challenge is to figure out which is the old SATA drive and which is the new. The old one has all the Tivo data on it; the new one is empty. Fortunately, the MFS Tools package has an “mfsinfo” utility in it that should display details about the Tivo data on the old drive, and an error on the new drive, so use that to tell which is which. In my case, the “lsblk” command showed me two 4TB drives, so I just needed to “inspect” both:
./mfsinfo /dev/sda
./mfsinfo /dev/sdb
The first command generated an error and the second showed details, so I knew I needed to copy from /dev/sdb to /dev/sda. Since I have a Tivo Roamio, the command I need to use (from the forum post) is:
./mfscopy -a /dev/sdb /dev/sda
It took about 11.5 hours to copy all the data (interestingly, with no errors — seems openSUSE and my PC are being a little more forgiving):

At that point, I can shut down the PC (using the button on the screen, or by running the “shutdown” command) and remove the temporarily-attached drives:

Insert the new one (model WD40EFRX in this case) into the Tivo, and do what you want with the old one (WD40EFAX in my case). Task complete, the Tivo is happy again.
Attachment: MFS3.32-dev.zip
[ad_2]
Source link


