[ad_1]
Thank you for joining me on this journey – hope you have enjoyed reading part 1 of this blog series.
You are half-way done if you have reached Part 2 of this series. I’ll continue by calling out the categorization we had done in our last post when defining the problem statement when it comes to RBAC and permissions:
- Minimize the chance of granting more permissions than necessary (part 1 post).
- Ensure the team only accesses the resources to which they are authorized (this post).
Let’s continue!
Ensure that the team only accesses the resources to which they are authorized
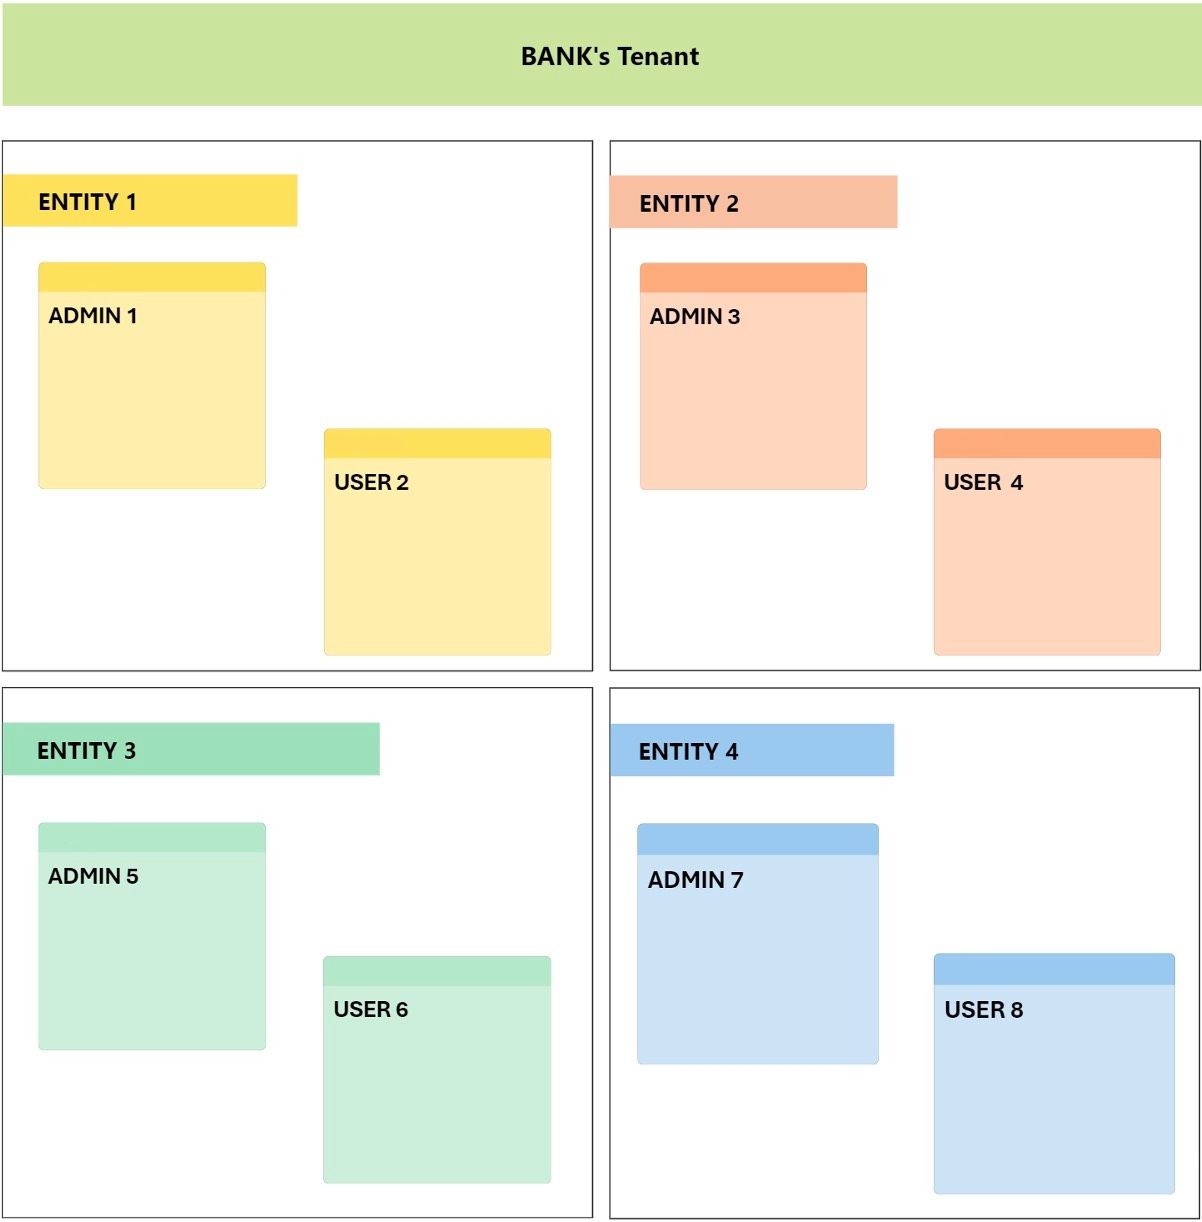
My bank customer (continuing from part 1) has a few entities in their Microsoft 365 tenant. These entities have their respective users and administrators. The aim is to make sure that these administrators should only be able to manage the users of their respective entities and nothing beyond that. Assume that Bank’s tenant is divided into 4 different entities.
For instance, (see diagram below), Admin 1 is a part of Entity 1 should only be able to manage User 2. Similarly, Admin 7 should only be able to manage User 8.
To deal with such scenarios, we need to create a Management Scope. By default, any administrator can manage any object in a tenant based on RBAC permissions that are assigned to them.
See the little boxes in the below diagram that divide these entities? That’s the “virtual segment” (aka. Management SCOPE) we’ll be creating between these entities to make sure that none of the administrators will be able to manage any user object beyond their scope.
We’ll start off with the same role group we created in our last blog post. That role group is currently scoped to Default. That means, the admin members of this RBAC will be able to perform changes on any user irrespective of entities.
- Role Group – SD Restrict
- Permissions (aka. Child Management Roles):
- SD Restrict – Mail Recipients
- SD Restrict – Retention Management
- Administrator<Members> – SD Test
- RBAC Scope – Default
You can’t change the scope of a Role Group once it’s assigned, hence we can’t change it now. To save time, I’ll be creating a copy of same role group (SD Restrict).
Remember the phases from part 1 post? Every activity starts with an approach and ends up in phases, here are mine:
- Phase 1: Find a unique attribute that’s common between users and administrators of each entity.
- Phase 2: Create the management scope (virtual segment) leveraging the common attribute.
- Phase 3: Assign the management scope to a Role Group.
Please note that these steps should only be taken as a reference point. It is strictly recommended to perform these in a test environment first and replicate in production only when you see desired results.
Phase 1: Find a unique attribute that’s common between users and administrators of each entity.
Confirm which unique value fits your case – please refer to this article to find what all recipient filters can be used: Filterable properties for the RecipientFilter parameter | Microsoft Learn
I’ll be using a CustomAttribute1 parameter to distinguish between different entities and create virtual segments. If you can’t find anything already existing unique to distinguish, you can choose and populate a parameter on users within a single entity. You just need to make sure that the parameter’s value on users should match with administrators for that entity to make it a common scope between them. For instance,
Entity 1 administrator’s CustomAttribute1 value:
Entity 1 user’s CustomAttribute1 value:
Phase 2: Create the management scope (virtual segment) leveraging the common attribute.
To create Management Scope, run the following cmdlet:
New-ManagementScope “Scope for Entity 1” -RecipientRestrictionFilter {CustomAttribute1 -eq 'Entity1'}
Refer to this link to understand more on the parameters: New-ManagementScope (ExchangePowerShell) | Microsoft Learn.
Phase 3: Assign the management scope to a Role Group
Once the management scope is created, it’s time to attach the scope to a role group. To save time, I’ll be creating a copy of the same role group SD Restrict we created in our last blog post.
Add Name & Description along with that select the newly created Write Scope <Management Scope>.
Hit Next and then add the permissions. As it’s a copy of a role group, the permissions would already be added. You can add/ subtract more as needed.
Add the desired members (administrators) into this role group and press Next.
Before finishing, review the settings. Once done, click on Add Role Group:
How do you know if this worked?
- To check whether management scope has been assigned to the desired administrators, try making changes on the users who aren’t part of this management scope.
- You should see the following error when managing a user who isn’t part your management scope (Scope for Entity 1🙁
- For a user who’s under the same management scope, you would be able to perform changes without any issues.
As we bring this two-part blog series to an end, I would like to call-out that you should start leveraging the power of customization in Exchange Online RBAC. It serves as a powerful tool in your arsenal, enabling you to establish granular access controls, enforce least privilege principles, and safeguard your critical resources from unauthorized access.
Thank you for joining me on this journey through the world of Exchange Online RBAC. I hope you found this series informative, inspiring, and actionable.
Kshitij Gulati
Cloud Solution Architect
[ad_2]
Source link


