[ad_1]
Windows PE has been around for quite a while. (I’ll avoid getting into the history here, but I may revisit that with a future post.) But the instructions for creating a Windows PE image of your own have been pretty much stuck in time: simplistic batch files. Still, most people never worried about the process, or complained about the instructions, because they never created a boot image on their own; they let a tool (e.g. MDT, SCCM, etc.) do it for them.
But it is a skill worth having, if nothing else so that you understand the process. Let’s walk through the steps, using something a little more modern than a batch file: PowerShell. The easiest way to do that is to analyze a script in chunks; I’ll attach the full script at the bottom of this post.
First, you need to install the Assessment and Deployment Kit, and then the Windows PE add-on, as described in the docs. (The Windows PE add-on is something relatively new. Windows PE was split out mainly so that it would be easier to update with fixes, separate from the rest of the ADK kit tools. That said, there’s still a resistance to doing that — usually you are stuck waiting for a new release, with community-published workarounds until then.) The current version of the ADK is still 2004 (not 20H2), and it’s quite possible that version will remain current for a while.
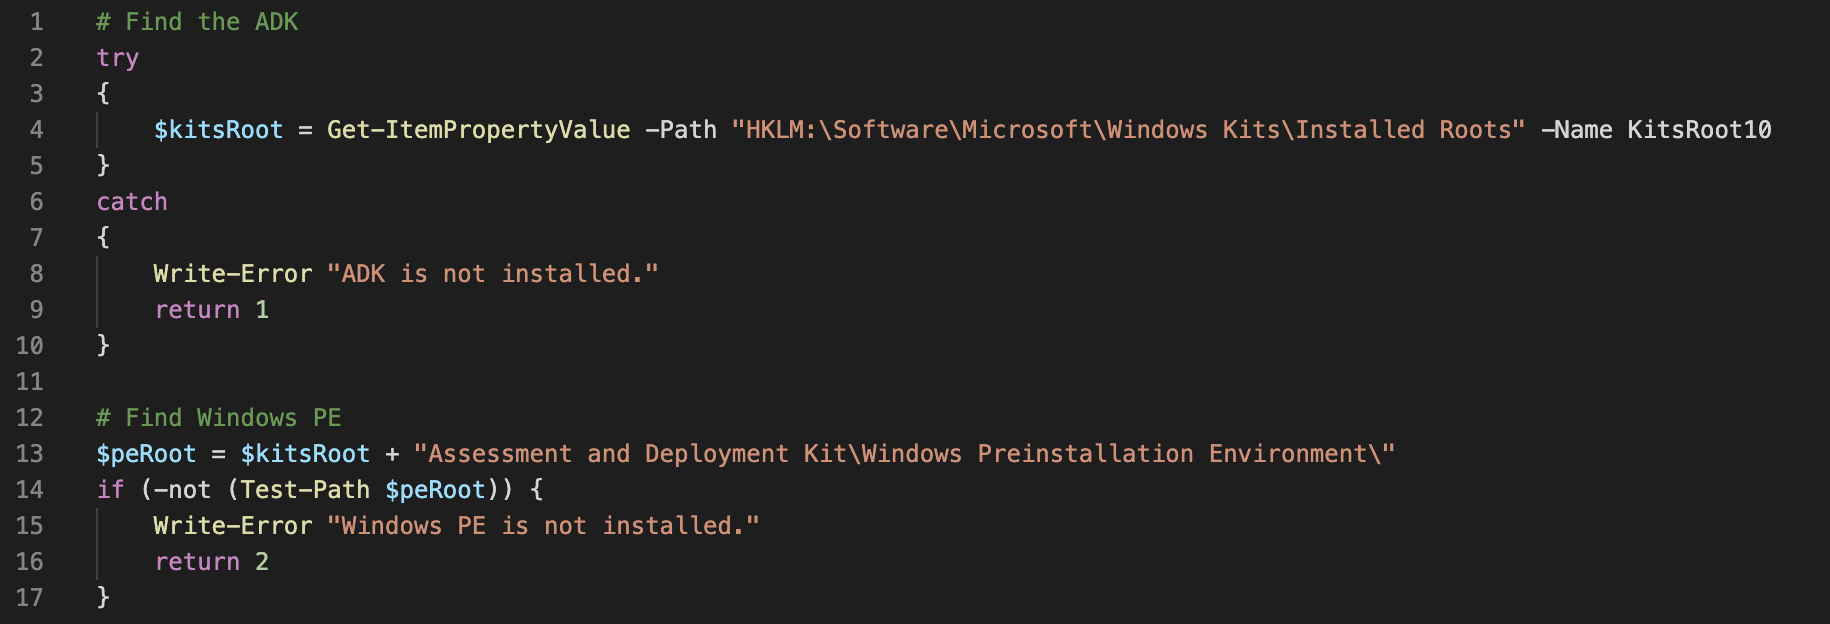
So how do you start? Simple, you need to find the right files from the ADK. Hard-coding is bad, so let’s look up the location from the registry.

Next, we want to create images for the needed platforms. There are three to choose from:

The “amd64” one is likely what you need (for both Intel and AMD-based 64-bit Windows installations), but if you’re still using legacy boot (not UEFI) and deploying x86 images, you can still create a 32-bit one as well. You might not have realized that there was an ARM64 option, but there is. Reading through the What’s New in Windows PE documentation, you might notice that it says the ARM64 platform was added in the Windows 8.1 timeframe, which I suppose is technically true — if you were an OEM creating Windows RT devices; they could get an ARM64 add-on. So when did it become available to everyone? With the ADK release for Windows 10 1809, which created the Windows PE add-on, the ARM64 images were added into the bundle along with x86 and AMD64.
For each platform that you select, the same steps are then required. First you need to make a copy of the winpe.wim from the ADK and mount it:

After it’s mounted, you can then make your needed modifications. The first modification is to add some useful optional components. I chose a few common ones:
- winpe-hta: Create hypertext applications (HTAs) using the IE engine, useful for displaying simple UIs (e.g. like those displayed by MDT)
- winpe-scripting: This adds the Windows Scripting Host engine, with VBScript and JScript scripting languages.
- winpe-wmi: Windows Management Instrumentation is used for getting information about the hardware Windows PE is running on.
- winpe-securestartup: Used to do BitLocker pre-provisioning in Windows PE.

You can find a full list of the available components in the documentation. Make sure that you install any mentioned dependencies, as well as the corresponding language resources for each one (like I do above, adding the “en-us” resources). For example, you might want to add the .NET Framework (winpe-netfx) and PowerShell (winpe-powershell).
But don’t get your hopes up on some of the listed items. For example, you’ll see a “winpe-wifi-package” in the list, but you won’t find this in the ADK. Instead, it’s a component that’s preinstalled in the Windows RE image (winre.wim) that is installed with Windows 10; it’s not something you can use yourself (at least not in any supported way). That’s been the biggest disappointment overall with Windows PE, as you see in the What’s New document: There really hasn’t been any significant enhancements to it since Windows 8.1.
But back to creating an image. In addition to optional components, you might want to also add drivers. That’s pretty simple:

Don’t get carried away though. You only want to add any wired networking or mass storage drivers that aren’t already supported in Windows PE.
Next, you might want to inject the latest cumulative update:

But I would avoid doing that unless you have to — if you do that, it will greatly increase the size of the boot image, unless you add two additional steps that I don’t include in my script: You would need to run a DISM command to clean up the image, then again after unmounting the WIM to export it into a new WIM (freeing up space taken up by files that are no longer used).
Most people want to do one other “vanity adjustment”: Changing the desktop background image from the default. The easiest way to do that is to overwrite the “winpe.jpg” file in the default Windows PE image. That takes a little manipulation to get past the security on the file:

All that’s left is to include any scripts or commands that you want to run when Windows PE boots. There are plenty of ways to do that, as I mentioned in my previous Windows PE startup blog post. So customize as required. Here’s what I typically do:
https://oofhours.com/2020/12/03/windows-pe-startup-revisited/

The first line adds a “winpeshl.ini” file, which has two lines:
[LaunchApps]%SYSTEMROOT%System32wpeinit.exe
When WPEINIT.EXE runs, it will process an unattend.xml file, so you have to add that too. It’s also not too complex:
<?xml version=”1.0″ encoding=”utf-8″?>
<unattend xmlns=”urn:schemas-microsoft-com:unattend”>
<settings pass=”windowsPE”>
<component name=”Microsoft-Windows-Setup” processorArchitecture=”amd64″ publicKeyToken=”31bf3856ad364e35″ language=”neutral” versionScope=”nonSxS” xmlns:wcm=”http://schemas.microsoft.com/WMIConfig/2002/State”>
<Display>
<ColorDepth>32</ColorDepth>
<HorizontalResolution>1024</HorizontalResolution>
<RefreshRate>60</RefreshRate>
<VerticalResolution>768</VerticalResolution>
</Display>
<RunSynchronous>
<RunSynchronousCommand wcm:action=”add”>
<Description>Bootstrap</Description>
<Order>1</Order>
<Path>wscript.exe X:Bootstrap.vbs</Path>
</RunSynchronousCommand>
</RunSynchronous>
</component>
</settings>
</unattend>
All you really need is a command to run, which in this case is “wscript.exe X:Bootstrap.vbs”. So the next line adds that script (which can do whatever you want, using wscript.exe so that it doesn’t show a command window on the screen).
The last line replaces the background bitmap. (Technically, there is one additional line after that, which could be uncommented to add a customized startnet.cmd file. See the Windows PE startup blog for more info on that.)
Then all you need to do is unmount the WIM, committing the changes.

So now you can run through the whole script and everything should work without errors. Except it doesn’t. If you run it exactly as-is, you’ll see some errors generated by the script, while it is running the ARM64 steps:

So what causes that? Well, while they added an ARM64 boot image to the Windows PE add-on package, they didn’t create an ARM64 version of “winpe-hta.” So as a result, there’s no way to use HTAs on an ARM64 boot image. But if you wanted to do a simple ARM64 depoyment (perhaps using something like Johan’s post here), you can certainly do that.
While this does generate the boot images that you need, it doesn’t cover one additional step, which I’ll leave for another blog: You need to be able to place these boot images into ISOs or onto USB media to actually boot a device. (If you want to do PXE, you don’t need any extra steps, beyond adding them to your WDS or other PXE server.)
The full script is attached.
Attachment: PEPrep.zip


