[ad_1]
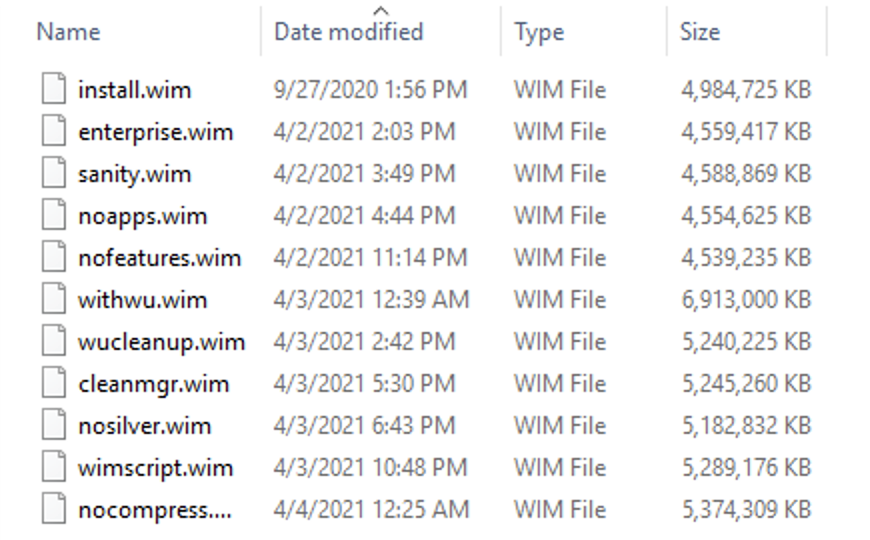
In my previous post, I talked about the size of Windows 10. (And yes, it’s slowly getting bigger.) But if you wanted to make a smaller image, how much smaller is even possible? Let’s see if we can find out.
As I mentioned, the size of Windows 10 Enterprise exported from the Windows 10 20H2 business ISO is 4.67GB:

So that’s the starting point. The first exercise is to prove that deploying that OS to a virtual machine, sysprepping it, and then capturing a new image — without changing anything — doesn’t result in a significant change of size. To do that “sanity test,” I’ll use an MDT task sequence. (I ran into a bug in MDT while doing this, so check out this post if you haven’t already.)

So the end result isn’t awful:

The image got a little bigger, which can probably be attributed to event log growth, but that’s quite reasonable (for now at least). Now let’s see if we can make it smaller.
Removing in-box apps
There are lots of people that don’t like the in-box apps anyway. (Personally, I like Calculator, but can’t say that I use too many of the others.) So, let’s remove as many of them as we can. Some are used as part of the operating system so they can’t be removed, but for simplicity let’s remove the rest using a trivial script added to the MDT task sequence:

The end result of that shows 40 apps (installed per-user) remain, along with zero provisioning apps (which doesn’t include the “hidden” system ones that you can’t touch, most of which correspond to those 40 per-user apps). How much disk space is freed up by that process?

Disappointingly, only about 34MB.
Removing optional features and capabilities
I’ve never understood why Windows 10 has both “Windows capabilities” (features on demand) and “Windows optional features.” But regardless, let’s try to remove all of those to see if it makes any difference. Again, that can be done with a pretty simple script (with the try/catch logic needed to handle the terminating error that you get when trying to remove a capability that can’t be removed):

The “Exit 3010” didn’t work either as the device didn’t restart until it found pending file rename operations later. So add a restart computer step after removing the features.
The result of this extra script:

Well, that only made a 15MB difference. Why so little? A couple of reasons:
- There aren’t many features on demand installed by default, so not much to remove there.
- You can’t actually remove optional features, you can just turn them off.
That second point is worth discussing a little more. Yes, there is a “-Remove” switch on the Disable-WindowsOptionalFeature cmdlet (and the corresponding DISM command line), but it doesn’t actually do anything. It used to, but starting with Windows 10 it no longer does.
To see what I mean, run the “Get-WindowsOptionalFeature -online” command after you’ve disabled all the features with the -Remove switch and rebooted (i.e. after capturing the image, let it go back through the specialization process and sign on as the local Administrator account). If the payload was actually removed, the “State” value for the feature should be “DisabledWithPayloadRemoved.” But there will be only one feature set that way, .NET Framework 3, because Windows 10 ships with that one removed. All the other “removed” features are only now “disabled.” Why? That’s tied to a little note that you can find on this doc page:
“Beginning with Windows 10, the payload is not removed from Windows client SKUs in order to support push-button reset. The payload is removed from Windows Server SKUs.”
Also note that Windows will put some of the features back automatically (e.g. some of the language components), so capture quickly before that happens (or build your image with no internet connection).
One final note: This will also remove (well, disable) Paint, Notepad, and WordPad, so it’s probably not something you want to do for a “real” system without adding some filtering.
Windows Update cleanup
This is a tough one. If you don’t download the latest ISO from Microsoft every month, you might just let the task sequence install the latest cumulative update. That’s easy to do by enabling at least one of the “Windows Update” steps in the task sequence:

But guess what? That makes the image bigger — very much bigger:

That’s a 2.4GB increase in size, caused by the doubling of a significant percentage of the Windows components in the OS: before applying the patch, there was one version; after the patch, there were two. Obviously there is some more cleanup needed any time you apply a patch to your image. So, let’s enable that by adding a new step to the task sequence to run DISM to get rid of the old versions, followed by another reboot:

You need to specify “/Cleanup-Image /StartComponentCleanup” to reduce from “many” versions to two versions (typically the original plus the latest patched version) and “/ResetBase” to get down to one version (just the latest patched version). So will that be good enough to reduce the size back to what it was before patching?

Not quite, still 700MB bigger than the smallest WIM I managed to create. A quick (and sadly, manual) comparison of the two points out some differences:
- More of the in-box app files disappeared. This is likely a result of some background cleanup operation having time to finish (during the servicing and cleanup operations), so I didn’t really get rid of all the app files in my initial attempt. But that means the growth issue is actually worse than it appears.
- Silverlight was installed. That’s likely a side effect of the MDT “install updates” task installing any available update. If you don’t want Silverlight, it would probably be best to exclude that explicitly (or use WSUS where that wouldn’t be approved).
- The servicing process added a whole bunch of files in windowsservicingLCU and windowsservicingpackages, along with the expected changes in windowswinsxs. It also added a bunch of empty folders in windowswinsxstempinflight, but those shouldn’t take up much space.
- Flash was removed — but still exists in the windowswinsxs folder structure (because you might want to put it back?).
- Delivery Optimization cached some stuff (probably the WU downloads).
- There were random changes due to Windows Search, Defender, Edge updates, OneDrive updates, etc.
So what did this prove? Well, just that there’s a certain amount of folly in trying to shrink Windows, because even after all of your efforts, you might find them all wiped out by the installation of an update.
But let’s ignore the futility of the exercise for now and see what else we might be able to clean up.
Automating disk cleanup
There is a built-in tool in Windows to clean up the disk, called Disk Cleanup. It runs CLEANMGR.EXE to do its thing. You can automate it (see my separate blog on that one) and add it to the task sequence:

Did it result in a reduced image size? No, in fact the image got a little bigger:

See this blog for more details.
Exclude Silverlight
Since I didn’t really want Silverlight, let’s go ahead and prevent it from being installed by adding an entry to CustomSettings.ini:

You can see that KB identifier in the BDD.LOG:

Also notice that the Defender definition update is failing with an 80070643 error code — repeatedly, with the ZTIWindowsUpdate script rebooting and trying again several times until it finally gives up. See my separate blog that has a workaround for that one.
Excluding Silverlight, the result gets slightly better:

A failed attempt at clearing the event logs
I tried one more thing that didn’t work at all: clearing all the event logs. I figured that they contained at least some events from the original image creation process and my imaging build task sequence, so maybe it could free up a little space. I used this PowerShell command manually to clear the event logs:
Get-WinEvent -ListLog * -Force | % { Wevtutil.exe cl $_.LogName }
But weirdly enough, that caused the amount of disk space used to grow, not shrink. I have no idea how that’s possible, but I gave up on this idea pretty quickly.
Excluding more stuff
MDT uses a template “wimscript.ini” file to exclude things that shouldn’t be captured:

That could conceivably be tweaked to exclude additional files. (And yes, there are plenty of garbage entries in there, which aren’t really worth going into, as well as some MDT-specific items.). But what else should be excluded, without causing any issues with the OS further down the line? That’s where things can get more interesting.
First, you need to know what’s included. The easiest way to figure that out is to dump a directory list to a text file:

Then you can open that in Notepad or Visual Studio Code to easily see what’s there. There are only 210,000 or so files in the OS, how hard can it be to scan through them looking for patterns of extra stuff? Ugh. By my quick scan, there were some .log files, but those are dangerous to broadly remove. The only ones I thought were less important were *.etl files. Outside of that, it would be necessary to explicitly remove individual files using their full path, and that’s a major hassle.
I did notice in the DISM documentation that there are also options to not compress certain file types, i.e. those that are already compressed (since the compression at best wastes time and at worst increases the file size), but those options aren’t in MDT’s wimscript.ini template. In addition to the four noted in the docs (.mp3, .zip., .cab, .pnf), I added a few more common ones (.wim, .png, .jpg).
The net result is this modified wimscript.ini file (located in the Tools<platform> folders on your MDT deployment shares), with the new files added:

But is it enough to make a difference? It made a difference, sure, but not a good one: the resulting WIM grew by about 107MB. That’s probably because of the compression entries — the files may not compress very well, but they do probably still compress some.
So I removed those entries and tried again. And guess what? It was still bigger.

Like I said before, futility. There is enough randomness in the process that I could probably run the same task sequence five times and get five different sized WIMs. They would all behave the same (I wouldn’t expect the differences in size to have any real impact on the operation of the OS), but each would have a slightly different set of extra garbage.
Finally
So what did we learn from this process? Well, for one thing, Microsoft does a pretty good job of keeping the Windows 10 media size small — you’d be hard-pressed to make it any smaller yourself. But that’s a direct result of how Windows was designed. While the OS might be fully modular with components that can be assembled in different ways to create the individual Windows SKUs (client and server), that modularity really only benefits Microsoft. You can’t “compose” your own OS in any meaningful way. Sure, you can add some optional components and/or features on demand, and you can remove things that aren’t truly part of the OS anyway (e.g. non-system UWP apps), but that’s it.
Maybe at some point in the future we can get an OS that is truly modular. Imagine being able to build an OS where you say “I don’t want any 32-bit app support” and therefore you have no WoW subsystem at all. Or where you can remove drivers that you don’t need. Or features that you don’t use.
For those of you who are familiar with Linux, you’re probably already recognized that this is something that it can already do. You can start off with a very small OS and add packages to it, or with a large OS and subtract packages from it. So you can end up with an OS as small as a few hundred megabytes or one larger than any Windows 10 installation would be (before adding apps).
It will be quite interesting to see if Windows 10x does anything to help with this. Perhaps because the first version isn’t expected to run Win32 apps, it will start off smaller than Windows 10. But will it stay that way? Will it be more modular? Time will tell.
[ad_2]
Source link